Blackboard Course BASICS
If you are new to Blackboard or need a quick refresher on the basics, here’s a 11 step checklist (with basic instructions and video demos) to help you get your course set up with navigation and content. If you are interested in more advanced features (like tests, assignment submissions, discussions, and online grade book) scroll to Step 10 for help options.
Step 0: Request the Blackboard Course Navigation Template from requestIT@wcsu.edu. The template provides a starting navigation structure for your course. NOTE: If you have multiple sections of the same course and you want to merge these into one Blackboard course, review Step 4 below before adding content or the template to your course.
Step 1. Login to Blackboard
Direct link: https://wcsu.blackboard.com/
Or from the WCSU website http://wcsu.edu/, Click on WestConn Essentials:

- Use your Western Account credentials to login
- Need help with this step? RequestIT@wcsu.edu or 203-837-8467
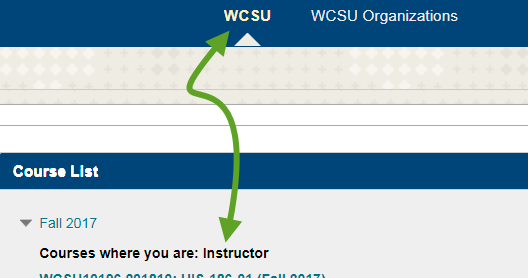
Step 2. Access your Course Shell(s)
Each course automatically gets a Blackboard course shell
- Need help with this step? RequestIT@wcsu.edu or 203-837-8467
Step 3. Turn Editing On
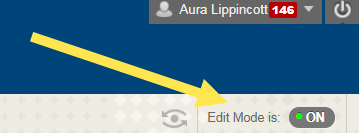
- Need help with this step? RequestInstructionalDesign@wcsu.edu
Step 4. Optional Decision: Merge sections of the same course
Are you teaching multiple sections of the same course? Do you want to merge these sections into one course?
Merging sections will give you one Blackboard Learn course shell with all of the students from each section. It allows you to modify section content once rather than for each section.
Step 5. Design the Course Menu
If you are using the Blackboard Course navigation template (Step 0), the basic menu is already provided. You may want to change or add items so please read on.
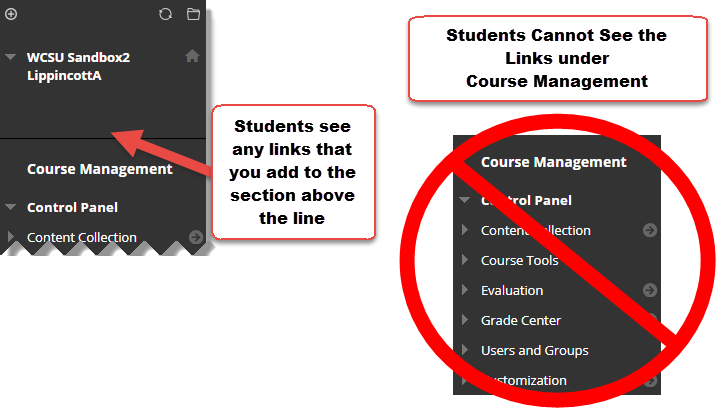
The Course menu is the left-hand navigation that your students will use to access course materials, activities, and tools that you provide. It starts out as empty if you have a new course shell. You decide the menu items needed for your course material and what they should be called. ***Note: the items under Course Management of the left navigation are only visible to the Instructor. Students DO NOT see these items. ***
- Think about how you want to organize material for your students – by type? – by Week or Unit? If you are sharing few things over the semester, by type might be enough. If you are sharing many things, you may want to organize the material by Week or Unit. Write it down on a piece of paper that you can refer to in Step 6.
- Need help with this step? RequestInstructionalDesign@wcsu.edu
Step 6. Build the Course Menu: Add Content Area links to the Course Menu
Now that you have decided which menu items you will need (don’t worry you can change these later if you want), let’s build the Course Menu starting with Content Areas. In step 8, you will add the course materials to these content areas.
Step 7. Add Tools to your Course Menu
Blackboard Tools are ready-made functions that you can add to your course. Common tools are Announcements, My Grades, Contact information, Calendar, etc. Some of these tools are accessible to you, the Instructor under the Course Management navigation area. By adding them to the Course Menu, students have a quick link to see the information in the tools.
Step 8. Add Syllabus and course materials
Now that you have built your Course Menu, the next step is to add content to the Content Areas that you added to the Course Menu. Course materials will likely include the Syllabus, and perhaps reading, watching or studying materials. Note: If you plan to have students submit assignments, participate in discussions or take exams using Blackboard, scroll to Step 10 for help options.
Step 9. Check your course with Student Preview
This provides a view of the course from a student perspective.
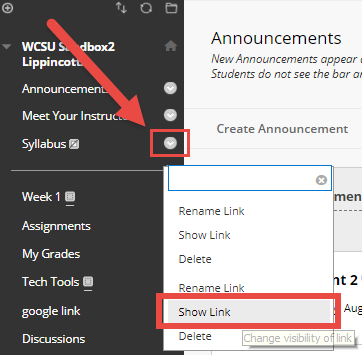
Tip: If you can’t see items that you expect to see when in student view, you may have hidden them. To unhide an item in the navigation, click the menu item options next to the hidden item and click Show Link.
Step 10. Help Options